sshでraspiに接続して以下のコマンドを1行ずつ入力
sudo su
cd /root
./incrediblefax11_raspi2.sh
インストールするかどうかを聞いてくるのでエンターキーを押して実行する。
~~~~~~~~~~~~~~~~~~~~~~~~~~~~~~~~~~~~~~~~~~~~~~~~~~~~~~~~~~~~~~~~~~~~~~~~~~~~~~~
WARNING WARNING WARNING WARNING WARNING WARNING WARNING WARNING WARNING WARNING
~~~~~~~~~~~~~~~~~~~~~~~~~~~~~~~~~~~~~~~~~~~~~~~~~~~~~~~~~~~~~~~~~~~~~~~~~~~~~~~
This script installs Hylafax/Avantfax/IAXmodem on Raspberry Pi 2 systems only!

You first will need to enter the email address for delivery of incoming faxes.

Thereafter, accept ALL the defaults except for entering your local area code.

NEVER RUN THIS SCRIPT MORE THAN ONCE ON THE SAME SYSTEM!!!

For the best chance of success, ensure you have fully updated your system with
apt-get update && apt-get upgrade -y BEFORE running this script. If you have
not yet done this, press crtl-C NOW to exit!!!
+++++++++++++++++++++++++++++++++++++++++++++++++++++++++++++++++++++++++++++++
Press any key to continue or ctrl-C to exit
続いて、メールアドレスを聞いてくるので自分のメールアドレスを入力してエンターキーを押す。
Enter EMAIL address for delivery of incoming faxes: メールアドレス
メールアドレスの確認をしてくるのでエンターキーを押す
FAX EMail Address: メールアドレス
If this is correct, press any key to continue or ctrl-C to exit
インストールが開始されるので終了まで待つ。
Reading package lists... Done
Building dependency tree
Reading state information... Done
ghostscript is already the newest version.
ghostscript set to manually installed.
gsfonts is already the newest version.
gsfonts set to manually installed.
libgs9 is already the newest version.
libgs9 set to manually installed.
libgs9-common is already the newest version.
libgs9-common set to manually installed.
libpaper-utils is already the newest version.
libpaper-utils set to manually installed.
libpaper1 is already the newest version.
libpaper1 set to manually installed.
待っていればそのうち終了するので、エンターキーを押すと再起動する。
ATTN: We now are going to run the Hylafax setup script.
Except for your default area code which must be specified,
you can safely accept every default by pressing Enter.
Press the Enter key to begin...
再起動するとHylaFAXのセットアップが開始される。
Setup program for HylaFAX (tm) 6.0.6.

Created for armv7l-unknown-linux-gnueabihf on Tue Mar 19 05:14:08 UTC 2013.

Reading cached parameters from /var/spool/hylafax/etc/setup.cache.

Found base64 encoder: /usr/bin/base64
Found Quoted-Printable encoder: qp-encode
Found mimencode for compatibilty: mimencode
Checking system for proper server configuration.

Make /var/spool/hylafax/bin/ps2fax a link to /var/spool/hylafax/bin/ps2fax.gs.


Make /var/spool/hylafax/bin/pdf2fax a link to /var/spool/hylafax/bin/pdf2fax.gs.

Update /var/spool/hylafax/status/any.info.

        HylaFAX configuration parameters are:

        [1] Init script starts faxq:            yes
        [2] Init script starts hfaxd            yes
        [3] Start paging protocol:              no
Are these ok [yes]?
よくわからないからとりあえずyesを入力。
そのあともよくわかないことを聞かれるけど全部yesと答える。
Modem support functions written to /var/spool/hylafax/etc/setup.modem.
Configuration parameters written to /var/spool/hylafax/etc/setup.cache.

Restarting HylaFAX server processes.

You have a HylaFAX scheduler process running.  faxq will be
restarted shortly, as soon as some other work has been completed.
Can I terminate this faxq process (13700) [yes]? yes
Should I restart the HylaFAX server processes [yes]? yes

/etc/init.d/hylafax start
Not starting HylaFAX daemons since they are already running.

You do not appear to be using faxgetty to notify the HylaFAX scheduler
about new modems and/or their status.  This means that you must use the
faxmodem program to inform the new faxq process about the modems you
want to have scheduled by HylaFAX.  Beware that if you have modems that
require non-default capabilities specified to faxmodem then you should
read faxmodem(8) manual page and do this work yourself (since this
script is not intelligent enough to automatically figure out the modem
capabilities and supply the appropriate arguments).

S<span style="text-decoration: underline;">hould I run faxmodem for each configured modem [yes]? yes</span>
この後、しばらくほったらかしておくといずれ終了。
~~~~~~~~~~~~~~~~~~~~~~~~~~~~~~~~~~~~~~~~~~~~~~~~~~~~~~~~~~~~~~~~~~~~~~~~~~~~~~~
Incredible FAX with IAXModem/Hylafax/Avantfax installation complete
~~~~~~~~~~~~~~~~~~~~~~~~~~~~~~~~~~~~~~~~~~~~~~~~~~~~~~~~~~~~~~~~~~~~~~~~~~~~~~~

Avantfax is password-protected. Log in as admin with password "password" using
a browser pointed to http://serverIPaddress/avantfax</span> or use Incredible Admin GUI.

Fax detection is NOT supported. Incoming fax support requires a dedicated DID!
See this post if you have trouble sending faxes: http://nerd.bz/10MecwG

Point a DID at the Custom Destination FAX (Hylafax) which has been created for
you in FreePBX. Outbound faxing will go out via the normal trunks as configured.
You may also route a fax DID to extension 329 (F-A-X) to receive inbound faxes.

A Hylafax webmin module has been placed in /usr/src/hylafax_mod-1.8.2.wbm.gz
This is added via Webmin | Webmin Configuration | Webmin Modules | From Local File

For a complete tutorial and video demo, visit: http://nerdvittles.com/?p=738

You must Reboot now to bring Incredible Fax online.

Press any key to reboot or ctrl-C to exit
何かキーを押すと再起動するというので何かキーを押す。
STOPPING ASTERISK
Waiting for Asterisk to Stop Gracefully...

Asterisk Stopped

[ ok ] Stopping web server: apache2 ... waiting .
[ ok ] Stopping MySQL database server: mysqld.
[info] Will now restart.
sshで接続していた画面が消えてpiが再起動する。
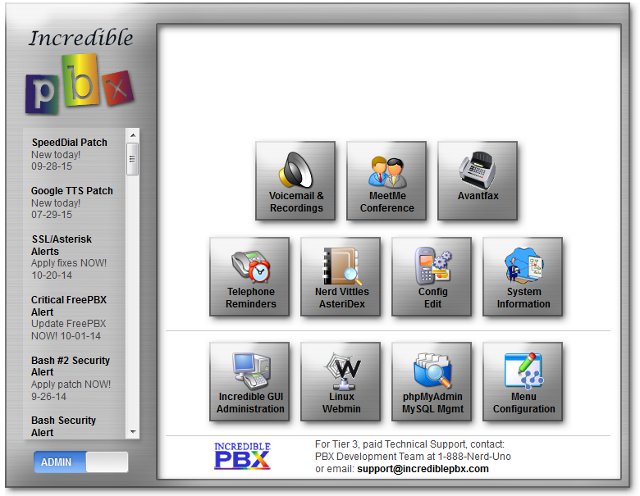
incrediblePBX画面を表示させるとちゃんとFAXが追加されている。
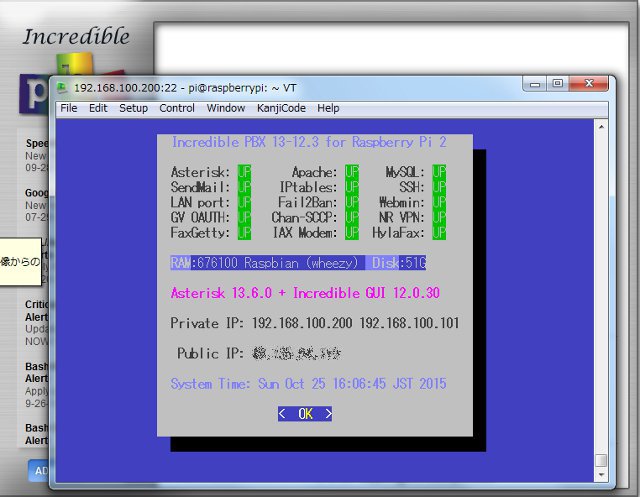
sshでpiに接続して
sudo status
を入力するとステータス画面が表示されてちゃんとFAXserverが動いているのが確認できる。
で、これをどうすれば使えるようになるのかはよく判らない。